We’ve seen it time and time again. Non profits and charitable organizations with websites that need a facelift. None are more familiar with this than animal shelters. The logic does make sense, as inconvenient as it is for the end-user. Saving animals takes precedence over a highly use-able website, as funds can only go so far. That’s when cheap lodoking adoptions pages creep into existence. Text only adoption pages, or the dreaded iframe embeds to a 3rd party system, meaning off-site content that you can’t do a thing with. But what if there was a way to easily improve the way animal shelters showcase their pets for adoption using Shelter Buddy – a popular animal shelter management application.
We recently donated a website to Regina Humane Society, my local Animal Shelter here in Regina, SK. They take in pets of all age, breed, temperament, or health and have a strong standing in the Regina community. We wanted to give this idea a whirl, and it proved to be highly successful. In an effort to share what we’ve learned and hopefully help other animal shelter’s out, here’s how we integrated shelter buddy with wordpress.
Obtain XML/ASPX from Shelter Buddy
Shelter Buddy accounts are provided with a unique URL for embedding adoptable pets via iframe. While this was useful once upon a time, in the modern day of API’s, Plugins, and ensuring content is on-site, this just won’t do. Talk to Shelter Buddy support and get access to your Shelter Buddy XML/ASPX file. It’ll look something like:
http://yoursheltername.shelterbuddy.com/DataFeeds/AnimalsForAdoption.aspx
Setup Your WordPress Environment
What we want is for each pet to have its own unique post in WordPress. We’ll need to pull in each pet listed for adoption and grab the data from Shelter Buddy and set it to custom fields or taxonomies. This all has the added benefit of providing additional content for your website, a big plus if you’re concerned with search engine optimization. Before we can start pulling in data from that Shelter Buddy data feed we’re going to need to setup our wordpress environment to handle more than just Pages & Posts.
Things we’ll be adding to the environment:
- A Custom Post Type for Pets
- A Custom Taxonomy for Pet Types (ie: Dogs, Puppies, Cats, Kittens, Rabbits, Birds, etc)
- Custom fields for:
- Pet Breed (ie: Border Collie or Terrier for dogs, Turtoiseshell or Siamese for Cats, etc)
[Note: this could go in a taxonomy instead, we chose not to go that route] - Shelter Buddy ID
- Gender
- Pet Colour
- Is the Pet Spayed/Neutered
- Pet Age
- Pet Weight
- Any other fields from the Shelter Buddy Data Feed that you might want to include.
- Pet Breed (ie: Border Collie or Terrier for dogs, Turtoiseshell or Siamese for Cats, etc)
Setup a Custom Post Type for Pets and Custom Taxonomy for Pet Types
Let’s keep WordPress clean and tidy by separating the Pet data from the posts or pages. Justin Tadlock has a great tutorial on adding custom post types. Typically we include them via mu-plugins, that way if they ever change themes, the data is still retrievable.
We’ve also included the Pet Types taxonomy – which is being attributed to the ‘base_pets’ post type. Once this is all created we’ll be a couple steps closer to having a fine tuned system in place.
<?php
/**
 * Custom post types & taxonomies
 *
 * @link http://codex.wordpress.org/Function_Reference/register_post_type
 * @link http://codex.wordpress.org/Function_Reference/register_taxonomy
 */

// ------------------------ CUSTOM POST TYPES ------------------------ //

function base_register_post_types() {


  /**
   * Pets
   */
  $base_pets_labels = array(
    'name'               => __('Pets', 'roots'),
    'singular_name'      => __('Pets', 'roots'),
    'add_new'            => __('Add New', 'roots'),
    'add_new_item'       => __('Add New Pet', 'roots'),
    'edit_item'          => __('Edit Pet', 'roots'),
    'new_item'           => __('New Pet', 'roots'),
    'view_item'          => __('View Pet', 'roots'),
    'search_items'       => __('Search Pets', 'roots'),
    'not_found'          => __('No Pets found', 'roots'),
    'not_found_in_trash' => __('No Pets found in trash', 'roots'),
    'parent_item_colon'  => '',
    'menu_name'          => __('Pets', 'roots'),
  );

  $base_pets_args = array(
    'labels'              => $base_pets_labels,
    'public'              => true,
    'exclude_from_search' => false,
    'menu_position'       => 20,      // below Pages
    'capability_type'     => 'post',
    'hierarchical'        => false,
    'supports'            => array('title', 'editor', 'thumbnail'),
    'rewrite'             => array('slug' => _x('pet-adoptions', 'Pets slug', 'roots'), 'with_front' => false ),
  );

  register_post_type('base_pets', $base_pets_args);

}

add_action('init', 'base_register_post_types');


// ------------------------ TAXONOMIES ------------------------ //

function base_register_taxonomies() {

  /**
	 * Pet Types
	 */
  $base_pet_types_labels = array(
    'name'              => __('Pet Types', 'roots'),
    'singular_name'     => __('Pet Type', 'roots'),
    'search_items'      => __('Search Pet Types', 'roots'),
    'all_items'         => __('All Pet Types', 'roots'),
    'parent_item'       => __('Parent Pet Type', 'roots'),
    'parent_item_colon' => __('Parent Pet Type:', 'roots'),
    'edit_item'         => __('Edit Pet Type', 'roots'),
    'update_item'       => __('Update Pet Type', 'roots'),
    'add_new_item'      => __('Add New Pet Type', 'roots'),
    'new_item_name'     => __('New Pet Type Name', 'roots'),
    'menu_name'         => __('Pet Types', 'roots'),
  );

  $base_pet_types_args = array(
    'hierarchical' => true,
    'labels'       => $base_pet_types_labels,
    'show_ui'      => true,
    'query_var'    => true,
    'rewrite'      => array('slug' => _x('pet-types', 'Pet Types slug', 'roots')),
  );
  register_taxonomy('base_pet_types', 'base_pets', $base_pet_types_args);


}


add_action('init', 'base_register_taxonomies');
Setup Custom Metabox with Custom Fields for Shelter Buddy Data
You’ll need to be fluent in adding custom fields for this to make much sense. Consider check out Jared Atchison and Bill Ericksons Custom Metaboxes and Fields for WordPress on Github. It’s very nicely documented and explains the process and provides several examples.
/**
 * For more on how to add custom metaboxes see: https://github.com/WebDevStudios/Custom-Metaboxes-and-Fields-for-WordPress
 *
 *
 * Pet metabox
 *
 */
function base_pets_details($meta_boxes) {
  $prefix = '_base_';

	$meta_boxes[] = array(
		'id'         => 'pet_details',
		'title'      => 'Pet Details',
		'pages'      => array( 'base_pets', ), // Post type
		'context'    => 'normal',
		'priority'   => 'high',
		'show_names' => true, // Show field names on the left
		'fields'     => array(
			array(
				'name' => 'Animal ID',
				'desc' => 'Please enter the animal ID',
				'id'   => $prefix . 'pets_animal_id',
				'type' => 'text_small',
			),

			array(
				'name' => 'Type',
				'desc' => 'Please enter the animal type',
				'id'   => $prefix . 'pets_type',
				'type' => 'text_small',
			),

			array(
				'name' => 'Breed',
				'desc' => 'Please enter the animal breed',
				'id'   => $prefix . 'pets_type_breed',
				'type' => 'text_medium',
			),

			array(
				'name' => 'Sex',
				'desc' => 'Please enter the animals sex',
				'id'   => $prefix . 'pets_sex',
				'type' => 'text_small',
			),

			array(
				'name' => 'Colour',
				'desc' => 'Please enter the colour of the animal',
				'id'   => $prefix . 'pets_colour',
				'type' => 'text_small',
			),

			array(
				'name' => 'Spayed/Neutered',
				'desc' => 'Has the animal been spayed/netered?',
				'id'   => $prefix . 'pets_spayneuter',
				'type' => 'text_small',
			),

			array(
				'name' => 'Age',
				'desc' => 'How old is the animal',
				'id'   => $prefix . 'pets_age',
				'type' => 'text_medium',
			),

			array(
				'name' => 'Weight',
				'desc' => 'How much does the animal weigh?',
				'id'   => $prefix . 'pets_weight',
				'type' => 'text_small',
			),
		)
	);

  return $meta_boxes;
}
add_filter('cmb_meta_boxes', 'base_pets_details');
Test Your New Environment and Add Hierarchical Template Structures
Give your new additions a whirl. Throw some dummy content in there to make sure things are working as intended. Then make sure that you’ve got all of the php files you need to make your new content shine. Such as:
- single-base_pets.php – The singular page for each pet – you may want to style it a bit differently than your blog posts. Try duplicating your single.php and going from there.
- content-base_pets.php – Your theme should load a separate template for the content inside of the single.php is to accommodate for multiple post types. It makes life much easier, trust me. See Codex on Template Hierarchy.
- adoptions.php – The overview of all pets for adoption, we recommend setting this up as a page template. Use a query t
- taxonomy-base_pet_types.php (optional) – If you’ve enabled the ability to browse by taxonomy you might want to setup these pages to look different than your category or archive pages.
Show Your New Pet Data Custom Fields
Here’s an example of showing what your content-base_pets.php would look like. We’re just defining some variables, then showing them with a conditional if variable is not empty echo data out. You would use similar techniques within a custom query for an overview page template. You can do some incredible things with this type of data, such as integrating it with filters, such as those seen on MixItUp – which is what we did for the Regina Humane Society adoptions page.
<?php
/**
* The default template for displaying content for base_pets custom post type
*
*/
//lets define some variables
$animalid = get_post_meta( $post->ID, '_base_pets_animal_id', true );
$pettype = get_post_meta( $post->ID, '_base_pets_type', true );
$petbreed = get_post_meta( $post->ID, '_base_pets_type_breed', true );
$petsex = get_post_meta( $post->ID, '_base_pets_sex', true );
$petspayneuter = get_post_meta( $post->ID, '_base_pets_spayneuter', true );
$petcolour = get_post_meta( $post->ID, '_base_pets_colour', true );
$petage = get_post_meta( $post->ID, '_base_pets_age', true );
$petweight = get_post_meta( $post->ID, '_base_pets_weight', true );
?>
<!-- START: content-base_pets.php -->
<article id="post-<?php the_ID(); ?>" <?php post_class(); ?>>
<header class="entry-header row">
<div class="twelve columns text-center">
<?php if ( is_single() ) : ?>
<h1 class="entry-title"><?php the_title(); ?></h1>
<?php else : ?>
<?php the_post_thumbnail(); ?>
<h1 class="entry-title">
<a href="<?php the_permalink(); ?>" title="<?php echo esc_attr( sprintf( __( 'Permalink to %s', 'requiredfoundation' ), the_title_attribute( 'echo=0' ) ) ); ?>" rel="bookmark"><?php the_title(); ?></a>
</h1>
<?php endif; // is_single() ?>
</div>
</header><!-- .entry-header -->
<?php if ( 'post' == get_post_type() ) : ?>
<div class="entry-meta">
<?php required_posted_on(); ?>
<?php if ( is_sticky() && is_home() && ! is_paged() ) : ?>
<span class="label radius secondary"><a href="<?php the_permalink(); ?>" title="<?php printf( esc_attr__( 'Permalink to %s', 'requiredfoundation' ), the_title_attribute( 'echo=0' ) ); ?>" rel="bookmark"><?php _ex( 'Featured', 'Post format title', 'requiredfoundation' ); ?></a></span>
<?php endif; ?>
</div><!-- .entry-meta -->
<?php endif; ?>
<?php if ( is_search() ) : // Only display Excerpts for Search ?>
<div class="entry-summary">
<?php the_excerpt(); ?>
</div><!-- .entry-summary -->
<?php else : ?>
<div class="pet-details">
<!-- Show that data if it exists -->
<ul>
<?php if (!empty($animalid)) { echo '<li>Animal Id: #' . $animalid . '</li>'; } ?>
<?php if (!empty($pettype)) { echo '<li>Type: ' . $pettype . '</li>'; } ?>
<?php if (!empty($petbreed)) { echo '<li>Breed: ' . $petbreed . '</li>'; } ?>
<?php if (!empty($petsex)) { echo '<li>Sex: ' . $petsex . '</li>'; } ?>
<?php if (!empty($petspayneuter)) { echo '<li>Spayed/Neutered: ' . $petspayneuter . '</li>'; } ?>
<?php if (!empty($petcolour)) { echo '<li>Colour: ' . $petcolour . '</li>'; } ?>
<?php if (!empty($petage)) { echo '<li>Age: ' . $petage . '</li>'; } ?>
<?php if (!empty($petweight)) { echo '<li>Weight: ' . $petweight . '</li>'; } ?>
</ul>
<?php if ( is_object_in_term( $post->ID, 'base_pet_types', 'dog' ) || is_object_in_term( $post->ID, 'base_pet_types', 'puppy' ) || is_object_in_term( $post->ID, 'base_pet_types', 'kitten' ) || is_object_in_term( $post->ID, 'base_pet_types', 'cat' ) ) {?>
<p><i> Show some content based on animal types set via is_object_in_term()</i></p>
<?php } ?>
</div>
<div class="entry-content">
<?php the_content( __( 'Continue reading <span class="meta-nav">→</span>', 'requiredfoundation' ) ); ?>
</div><!-- .entry-content -->
<?php endif; ?>
<footer class="entry-meta">
<?php if ( 'post' == get_post_type() ) : ?>
<?php get_template_part('entry-meta', get_post_format() ); ?>
<?php endif; ?>
</footer><!-- #entry-meta -->
</article><!-- #post-<?php the_ID(); ?> -->
<!-- END: content-base_pets.php -->
Import Content from Shelter Buddy Data Feed
Okay – so your fields and custom post types are setup.Your data is showing on the front end, you might have even spent some time really fleshing it out to look pretty. Nice work! Go remove all of the dummy data you created before testing out this next bit.
All that’s left is to start getting that data from Shelter Buddy’s data feed. While there’s countless ways you could pull that data in via PHP, the easiest and most foolproof method we came across is with the help of WP All Import by Soflyy. If you’ve ever needed to import some funky XML or CSV files and find a way to place data into the appropriate fields, WP All Import is a huge time-saver.
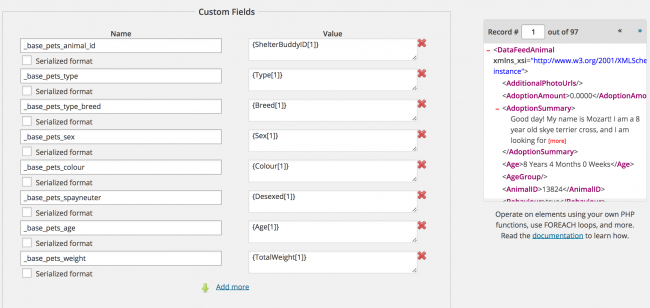
Using their drag and drop interface you can select specific elements and attributes and set them to specific fields, such as the ‘base_pets’ title, the content, or any of the custom fields or taxonomy terms we’ve set. You can even pull in the image URL and instruct WP All import to store the image on your server and set it as the featured image.
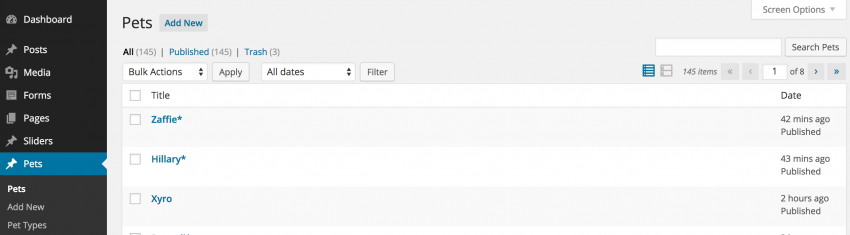
Once your fields and title and content are set to grab the appropriate data, just run the import! Depending on your hosting account, this could take a while. But you’ll soon find that your backend is filled with pets, waiting for adoption.
Note: One thing we should warn you about. Ensure that your hosting account doesn’t have a low phptimeout as this process takes a while for each import. We ran into problems with WP Engine as they really lock their server settings down to keep things zippy for their customers. Consider checking out Siteground or MediaTemple if you’re going to be doing lots of large imports with multiple images.
Now let’s automate the Pet Data import!
Wouldn’t it be great if you could pull in that data to ensure your animal shelter’s website has the most up to date pets available for adoption. Nothing angers people more than going into a shelter, with their heart set on Skippy the Three-legged Terrier, only to find out he’s been taken home by someone else.
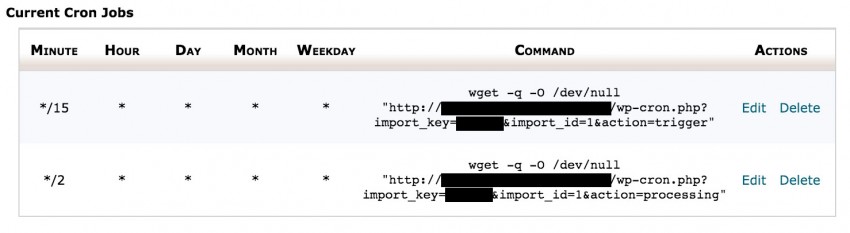
Setup 2 Cron Jobs:
Set to run every 2 minutes (or 15 if that’s all you’re limited to, but note that the import may take longer to process)
wget -q -O /dev/null "http://YOURWEBSITE.COM/wp-cron.php?import_key=YOURKEY&import_id=YOURIMPORTIDNUMBER&action=processing"
Set to run every 15 minutes to trigger the import and instruct processing URL to instruct WP All Import to pull data from Shelter Buddy’s ASPX file.
wget -q -O /dev/null "http://YOURWEBSITE.COM/wp-cron.php?import_key=YOURKEY&import_id=YOURIMPORTIDNUMBER&action=trigger"
WP All Import provides easy instructions on how to setup a cron jobs to pull that data at regular intervals. Assuming your hosting account allows cron jobs, it’s just a matter of setting up the trigger & processing URL to run every 15-20 minutes to keep the data up to date with Shelter Buddy. This can usually be accessed via Cpanel, or contact your hosts tech support and give them the URLs you need to run and let them know how often to run them. I’ve tested the Cron Job method using Easy Cron tied into WP Engine, as well as Hostgator. Though WP All Import recommends Siteground or MediaTemple due to their longer phptimeout limit. It should work for just about any host that allows for cron jobs though.
In order for your import to compare your Shelter Buddy database of pets to your WordPress Database of Pets, you’ll need to use record matching. Fortunately WP All Import comes with a couple types. Depending on your scenario, you can choose either, but I’d recommend Option 1.
Option 1: Automatic Record Matching
When you first create your import, you have the ability to set a record matching field. You can select anything from Animal ID, Post ID, etc. Whatever you do, don’t just use the animal’s name or the post title. There will likely be countless Fluffy the cats going through a shelter and you don’t want to make it easy for the system to get confused. Try using a combination of Post Title and Animal ID – which is what I’d recommend. That way when the record matching is taking place it will be able to tell that fluffy-8675309 is different from fluffy-902189. We want to avoid accidental deletion or overwrites. The only way to change this down the road is to recreate the import template from scratch and set it properly during the import setup. So be careful when you’re creating your first import.
One drawback with this method is that the automatic record matching doesn’t allow you delete pets that weren’t placed there from a previous import. So if you’ve done any database migrating, you might find a few pets that have already been adopted won’t get removed automatically. If you’re going to use Automatic (which I recommend) just be sure to delete all pets and clear the trash and start from a fresh import, especially if/when you’re migrating from local to staging to live servers.
Option 2: Manual Record Matching
If you don’t ever plan on deleting animals, or plan on manually deleting pets when they’ve been adopted (kind of defeats the purpose, but hey whatever floats your boat) then this route will suit you just fine.
If you have to go this route, I’d recommend setting up Manual Record Matching via the Shelter Buddy animal id. By setting manual record matching the import script can compare all posts within your custom post type, rather than the posts from the last imports. Just note that this method does not allow you to delete posts automatically.
Boom Shakalakalaka
Just like that you’ve integrated Shelter Buddy with WordPress. No ghetto iframes, just pure styled inline content that you have complete control over. Throw some jquery or php queries to allow users to filter pets by their preferences and you’re set. I’ve spoken with Shelter Buddy’s lead developer and he informed me that they’re working on an API but that it’s a ways away. So for now, this is the best way to get these two systems to work together.
View Demo
If you have any questions please contact us or leave us a comment below. If you’re a Humane Society or an Animal Shelter in need of a custom website design or just need a point in the right direction, please don’t hesitate to reach out.
Update: Fixed Cron Job Trigger and Execution Script.
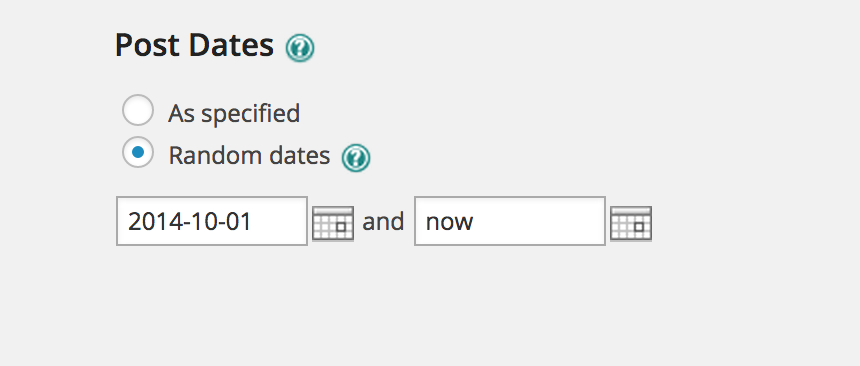
Update 2: Some people are reporting Pets being placed into schedule format instead of published format after import. See this WP Beginner Tutorial on Fixing Missed Schedules or if you aren’t using the publication date for anything you could set the post date to any date before the current date.
Update 3: After WP All Import 4 came out my imports stopped working. I just ended up recreating them from scratch and updated Import Speed Optimization settings to Iterative, piece by piece processing (20 records per iteration) and disabled split file into 1000 record chunks. This allowed it to proceed with the imports.